Target Audience: You are comfortable writing HTML markup or are able to generate the output described in this entry.
TL;DR: The end result.
Marking up a blog post #
I try to keep the markup for journal entries on bridgestew.com as small as possible. In reality, there is a bit more going on here when you inspect the pages with developer tools provided by the browser, but I simplified it to the bare bones for the sake of explaining the microformats that would be applied. Here's what the HTML includes:
- Wrap the content in an
articletag. - Use an
h1for the post's title, which is important for SEO and accessibility purposes. - Use a
ptag for the intro paragraph that provides context for what the post is about. - Wrap the meat of the post in a
divto provide a quick visual for the start and end of the content. The content within thatdivcould have any number of element tags in use. - Use
navon the navigation links that enables the reader to return to the list of articles without having to scroll to the header of the site to click the "journal" link.
<article>
  <h1>Title goes here</h1>
  <p>Summary goes here</p>
  <div>
    <p>Lots of text goes here</p>
    <p>And more text.</p>
    <p>Just like a blog post.</p>
  </div>
  <nav>
    <a href="/journal/">← All journal entries</a>
  </nav>
</article>
Here's how that block of code gets the appropriate microformat properties:
The article tag, which surrounds the content gets the h-entry class on it, signifying that everything inside those tags is related to this journal entry.
<article class="h-entry">
...
</article>
The h1 gets a class of p-name so that parsers will interpret it as the blog post's title.
<article class="h-entry">
  <h1 class="p-name">Title goes here</h1>
...
</article>
Next, I'll add class="p-summary" to the introductory paragraph.
<article class="h-entry">
...
  <p class="p-summary">Summary goes here</p>
...
</article>
Lastly, I'll add class="e-content" to the div that surrounds the body of the article.
<article class="h-entry">
...
  <div class="e-content">
    <p>Lots of text goes here</p>
    <p>And more text.</p>
    <p>Just like a blog post.</p>
  </div>
...
</article>
That's it! If I stop here, I have successfully let a machine know what this content is and how to best interpret it. But, I'm not going to stop here. It is common for posts to be accompanied with some metadata, so I'm going to add some and provide richer meaning by including additional class names.
Because of how I want to structure my page, I'm going to put the metadata above the post content. That's just my preference. It doesn't have to be at the beginning.
First, I'll add a date the post was published with class-"dt-published" on the time element:
<article class="h-entry">
  <time class="dt-published" datetime="2019-01-12">Jan 19, 2019</time>
...
</article>
Then, I'll add the name of the person who authored the post. Most of the time, that is going to be me and will seem redundant, but I am choosing to do it anyway. This could be a lot more meaningful on a site that has multiple authors or guest bloggers. Mark this up as a link that leads back to the homepage of their website. In this case, it will be my own site.
This anchor (link) tag will receive 2 classes:
h-cardwhich lets the parser know that we are surrounding content with a new microformat context for a person or organization.p-authorwhich denotes the author of the blog post.
<article class="h-entry">
...
  <a class="h-card p-author" href="/">Bridget Stewart</a>
...
</article>
Lastly, I am going to add a list of tags that categorize the content. These tags can be useful aids for visitors seeking blog posts related to the one they just read. The tag link will lead to a page that gathers all the posts with the same tag and display them as a list. Each link will receive class="p-category" and rel="tag".
<article class="h-entry">
...
  <p>
    <small>Posted under:</small>
    <a class="p-category" rel="tag" href="/tags/tag-1/">tag-1</a>
    <a class="p-category" rel="tag" href="/tags/tag-2/">tag-2</a>
    <a class="p-category" rel="tag" href="/tags/tag-3/">tag-3</a>
  </p>
...
</article>
Now, I'm finished! I have metadata and content all semantically marked up with rich semantic meaning for a parser or scraper to consume and understand. When we put it all together, this is how the code looks.
The end result #
<article class="h-entry">
  <time class="dt-published" datetime="2019-01-19">Jan 19, 2019</time>
  <a class="h-card p-author" href="/">Bridget Stewart</a>
  <p class="tag-list">
    <small>Posted under:</small>
    <a class="p-category" rel="tag" href="/tags/tag-1/">tag-1</a>
    <a class="p-category" rel="tag" href="/tags/tag-2/">tag-2</a>
    <a class="p-category" rel="tag" href="/tags/tag-3/">tag-3</a>
  </p>
  <h1 class="p-name">Title goes here</h1>
  <p class="p-summary">Summary goes here</p>
  <div class="e-content">
    <p>Lots of text goes here</p>
    <p>And more text.</p>
    <p>Just like a blog post.</p>
  </div>
  <nav>
    <a href="/journal/">← All journal entries</a>
  </nav>
</article>
Testing the updates #
Returning to the IndieWebify.me h-entry validation page, I drop the link to a journal entry from bridgestew.com in the field and click "Validate h-entry". As the image shows, the h-card is successfully implemented.
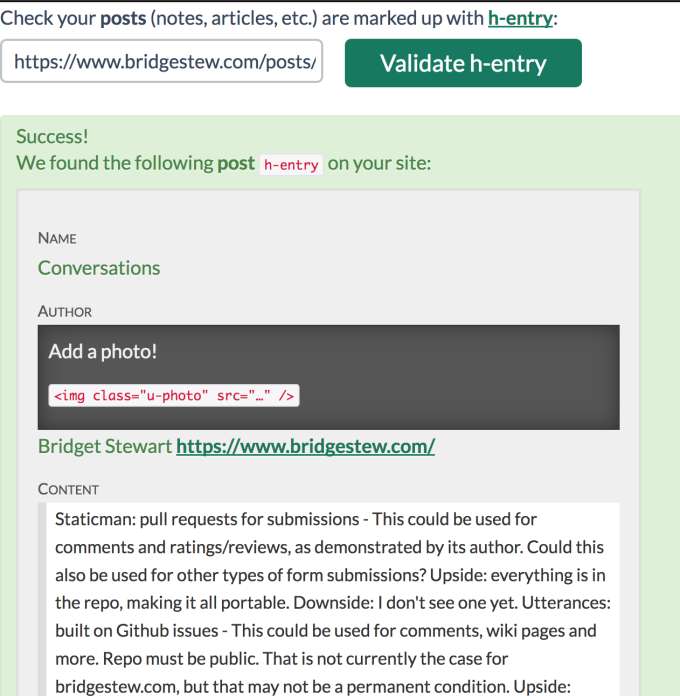
Conclusion #
I am unlikely to add a featured image to go along with journal entries, but never say never. If this site evolves in that direction, I would include class="u-photo" on the img element. As for how journal entries are being parsed on bridgestew.com as of now, I consider this another successful step toward IndieWeb-iness.